Voxelization Published: 8/18/2022
Basics and tutorial setup
Voxelization is taking the 3D Minecraft world made up of 3D pixels and storing it in a 2D texture made up of 2D pixels. Voxelization by itself doesn’t need to be integrated into a raytracing engine, you can use it to for instance create custom floodfill lighting.
To explain everything clearly, we’ll take the usual approach when trying to simplify a 3D idea: we’ll reduce every dimension by 1.
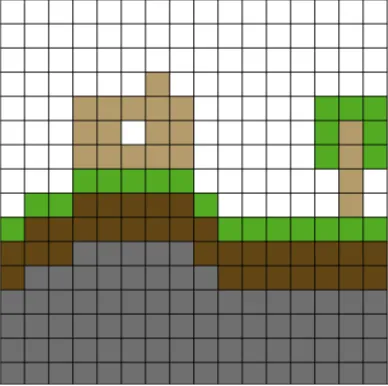
Let’s imagine Minecraft is a 2D game and we only have access to 1D textures to store stuff in (in other words, how do we store a 2D array in a 1D one). We’ll expand to 3D in the last chapter. So, we’ll start out with the game already in a (kind of) functioning state:
Some important parts about these interactive elements: Each will build on top of the last, so UI elements will stay consistent. The view is divided up into two parts: One shows the “game” and the other (will) show the texture we voxelize the game into (currently this is blank). You can change the orientation of these two elements in the controls box on the top right. The block selection input can also be found there, you can place the block you select by clicking on the grid cells. “Delete” deletes blocks.
One important thing to note is the limited playfield. This is important, as our texture won’t be infinite, we can only voxelize a set range. In reality you would center this range on the player and voxelize part of the infinite world.
Mapping
Mapping 3D space into 2D (or in our case 2D space into 1D) is about assigning every single 3D position inside our predefined range a 2D coordinate. This is what most people don’t understand at first: we don’t use the colors of a buffer to store where the blocks are, we store the positions of the blocks implicitly by placing their data in the right pixels. This is why this step requires either geometry shaders or imageStore, we need to be able to write to the pixels we want to store the blocks in.
You can do this in a variety of ways, but we will look at one of the simplest (albeit not very cache-friendly) options.
Let’s look at an example scene:
To convert this to 1D we can just take every line of the image one by one and place it next to each other:

And that’s it, it’s voxelized. The algorithm for this is quite simple, since this is the 2D->1D case we only really need to give each block an index (or in other words a single x coordinate) in the output buffer. To do this we can use the fact that our range is limited, we only store a 16x16 area. Each line from the original image will take up 16 positions in the output, therefore the first line will go from position 0 to 15, the second will in turn go from 16 to 31 and so on. Since we are coding, the first line should have an index of 0, the second line 1, etc. We can then generalize where each line starts at, the first block in line n should be at n *16. Placing the blocks inside the area of their respective lines can be done by just offsetting them from the first block in that line by their x position.
Let’s look at an example. The block at position (3, 4) is a wooden block
(remember, this is programming, the top left block is (0, 0)). Since this is
line 4 the first block in that line should go at index 4 * 16 = 64. To get the
position of the actual block, we can just add 3 to it: 64 + 3 = 67. Let’s
implement this into our visualization:
In the visualization the bottom screen contains a representation of our 1D texture. Since I didn’t want to make the pixels too small, it wraps around at the edges. I marked the start of every 16th pixel by red. Try placing some blocks and seeing how the output changes.
Keep in mind that this is only a visualization. In reality every block would only take up a single pixel and we wouldn’t draw the grid lines or the markers.
In GLSL this would look something like
// pos is the position of the block centered around the player
// range is the size of the area we want to store
// textureSize is the width of our 1D texture
float mapTo1D(vec2 pos, vec2 range, float textureSize) {
	// We offset everything by half of the range
	// to make sure it's positive
	vec2 offsetPos = pos + range / 2;

	// We convert our offset position to the output
	// pixel position
	float pixelPos = offsetPos.y * range.x + offsetPos.x;

	// Then we convert it to a texture coordinate
	return pixelPos / textureSize;
}
Storing data about voxels
Some things to note about voxelization, mainly what it cannot do:
- Voxelization can’t store the color of a point in the world. Each block is just 1 pixel, there’s not enough space
- Voxelization can’t implicitly store block shapes. To do this we’d have to split the world up into subblocks, but this would use more space, limiting us in how much we can store, and it would also break on blocks, like tallgrass or the dreaded lectern.
The visualization currently stores colors. This works in this one case, since our blocks are solid colored squares, but you can’t do this usually. To solve this issue, we need to use the colors in our buffers as storage.
What and how you store it is completely up to you and bitmagic is outside of the scope of this document, but as an example in my implementation I store the texture coordinates of the top-left corner of the texture inside the atlas.
As another example, if I were to use voxelization to create a custom floodfill lighting shader, I’d write solid, non-emitting blocks into my voxel storage as black and for light sources I’d store their light colors, then I’d run a progressive floodfill algorithm on the resulting buffer.
Reading the voxelized data
When we want to read the data from the voxel storage, we always have a position and we want to query what block is at that position. This is very simple, since we already have a function that takes us from world space to storage space in the form of our mapping function, so all we need to do is pass it the required position variable and sample our voxel texture.
Expanding to 3D
Everything in this document works in 3D as long as you provide a mapping function that takes you from 3D to 2D. You can do this in the same way I did by storing each horizontal layer next to each other. Every time you add a layer, you need to offset it from the previous’ position by the width of each layer and when you fall outside of the texture, you wrap around and offset by the height. In code this would look something like
// pos is position of the block centered around the player
// range is the size of the area we want to store in every direction
// textureSize is the size of the storage texture
vec2 map3Dto2DLayers(vec3 pos, vec3 range, vec2 textureSize) {
	// Offset by half of range to make it positive
	pos += range / 2;

	// Calculate the start of the layer
	vec2 layerPos = vec2(
		// X should increase by range.x each time, but
		// should never go above textureSize.x
		mod(pos.y * range.x, textureSize.x),
		// y will be as many times range.z, as the layer overflows on the x axis
		floor(pos.y * range.x / textureSize.x) * range.z
	);

	// We offset the layerPos by the horizontal position
	return (layerPos + pos.xz) / textureSize;
}
This is only optimal if your range size divides the width and height of the voxel texture perfectly.
An alternative solution is to go down to 1D and then back up to 2D. This is even
shorter than the previous version and uses similar math. We can give an integer
index to every block in 3D the same way we did it in 2D, but we need to add 1
extra dimension. The 2D case relied on the fact that each horizontal line
consists of range.x blocks, in 3D we also add that each horizontal slice
consists of range.x * range.z blocks:
// pos is position of the block centered around the player
// range is the size of the area we want to store in every direction
// textureSize is the size of the storage texture
vec2 map3Dto2DIndex(vec3 pos, vec3 range, vec2 textureSize) {
	// pos.x is position in current horizontal line
	// pos.z * range.x is the index of first block in the line
	// pos.y * range.x * range.z is index of the first block in the horizontal
	//   slice
	float index = pos.x +
			(pos.z * range.x) +
			(pos.y * range.x * range.z);

	// Convert back to 2D
	return vec2(
		mod(index, textureSize.x),
		floor(index / textureSize.x)
	) / textureSize;
}
Calculating the range
Range is basically the size of the area we want to store, it’s limited by the
voxelmap resolution, but there are different ways to divide the available space.
I’m going to assume that you want to keep the width and depth of the area equal,
so range should always be in the form (w, h, w).
From this point on I’m going to call the vertical resolution of the voxelmap
vertical, the horizontal resolution, horizontal, the height of the range
height and the width and depth of the range simply width.
Since our voxelmap contains horizontal * vertical pixels and each block is
going to be stored in a single pixel it’s obvious that
.
Layered approach
The only requirement we have on top of the previous one with this approach is that the layers should perfectly tile the voxelmap to not waste space. From this we can also gather that
In this case you can do two things:
1.) Make the size of the range equal
. This voxelizes a cube-shaped area and works best when the voxelmap is a square and the resolution is a power of 8, so for instance for a resolution of 4096 (8^4) you’ll get an area of 256x256x256. Some other values: - 1024 x 2048 -> 128 x 128 x 128 - 512 x 512 -> 64 x 64 x 64
2.) Set the height to a constant value and calculate the width and depth from that. This is a better option if the voxelmap resolution doesn’t work for the first approach. It basically sacrifices some vertical distance for extra horizontal. Since we want the width and depth of the layers to be equal we can calculate them as
When working with a square voxelmap, the height should be a square number
because of the tiling, when the voxelmap is half of a square (e.g. when sharing
the texture with a different map) it should be half of a square number, etc. For
instance for a resolution of 2048 x 4096 we can choose 128, since our voxelmap
is half of a square and 128 is half of 256. We can then calculate the width and
get 256, so the range becomes (256, 128, 256)
Indexed approach
The indexed approach is only useful if you have weird non-power-of-two voxelmaps and the layered approach would waste too much space, for example I use this in my vanilla shader, since I have place the voxelmap on the screen. In this case range should be hand picked to utilize the given area as much as possible and there’s no general equation.
Related articles: