Voxel tracing with interactive examples Published: 8/17/2022
Foreword
Voxel tracing is a variation of raytracing which uses a voxelized version of the scene. There are a couple different implementations, but a lot of them rely on branching, which makes the performance suffer when they’re used on the GPU. In this article I’ll go through the basic algorithm and a potential way to optimize it.
This article will assume you have some knowledge of shaders. For the example code I’ll be using GLSL, but it should be simple to adapt this to other languages if you have some experience in them. The interactive examples will be done using ShaderToy, which uses GLSL ES. If your browser doesn’t support WebGL, then let me welcome you to the future. Please switch your Netscape Navigator to something more modern.
Line drawing algorithms - DDA
Voxel tracing relies on the same type of algorithms paint programs use to draw straight lines. There are two kinds:
- For pixel perfect lines the most common algorithm is Bresenham’s line algorithm. The result this type produces looks pleasing for the same reason they aren’t useful to us: They skip pixels to make the lines thinner.
- For non-pixel perfect (you could call them “full” or “thick”) lines the most common algorithm is the DDA algorithm. This wasn’t strictly made for drawing lines, but interpolating between two values, but luckily lines are just interpolations between two points.
Example output for these two functions:

As you can see, the DDA algorithm doesn’t skip pixels, this is important or otherwise we’d get gaps in our output.
DDA for raytracing
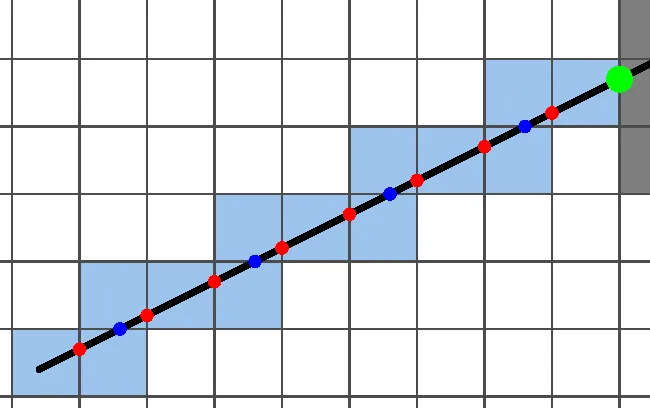
Using DDA for raytracing requires a small modification to the algorithm, usually it just goes through the pixels or voxels that lie along the specified line from one end to the other in order. However when we want to use it for raytracing, what we need is either the closest intersection point with a solid voxel or just all intersection points. Example:
Click on the image to move the direction of the ray. The red dots symbolize each time the ray hits a vertical wall and the blue dots are for each horizontal one. The large green dot is the first actual intersection.
Technically speaking with the changes described above this strays a bit from the actual DDA algorithm, but since most people refer to this specific variation as simply DDA and since I like not destroying my SEO, I’ll use the name too.
Basic algorithm
Before we look at an implementation, let’s take a closer look at the earlier interactive example again:
You might already see the important part, but if you don’t, let’s separate out the red and blue dots:
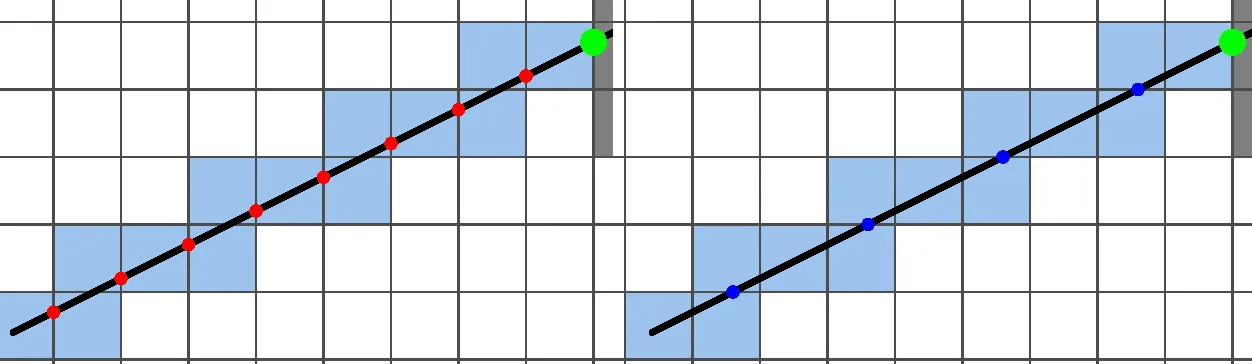
As you can see, the distance between the red and blue dots stays constant along the ray. This is important, since we can just keep track of the current distance to each of these points and subtract the step sizes to know which one’s currently closer to us.
Implementation
If you scour the internet a tiny bit, you’ll no doubt come across the following (or similar) implementation:
// origin is the ray starting point
// direction is the ray direction
// STEP_COUNT is the maximum number of steps we take before we stop

vec2 stepSizes = 1.0 / abs(direction);
vec2 stepDir;
vec2 nextDist;

if (direction.x < 0.0) {
    stepDir.x = -1.0;
    nextDist.x = -fract(origin.x) / direction.x;
} else {
    stepDir.x = 1.0;
    nextDist.x = (1.0 - fract(origin.x)) / direction.x;
}

if (direction.y < 0.0) {
    stepDir.y = -1.0;
    nextDist.y = -fract(origin.y) / direction.y;
} else {
    stepDir.y = 1.0;
    nextDist.y = (1.0 - fract(origin.y)) / direction.y;
}

vec2 voxelPos = floor(origin);
vec2 currPos = origin;
for (int i = 0; i < STEP_COUNT; i++) {
    vec2 normal;
    if (nextDist.x < nextDist.y) {
        // Closest face is in the x direction
        voxelPos.x += stepDir.x;
        currPos += direction * nextDist.x;
        nextDist -= nextDist.x;
        nextDist.x += stepSizes.x;
        normal = vec2(-stepDir.x, 0.0);
    } else {
        // Closest face is in the y direction
        voxelPos.y += stepDir.y;
        currPos += direction * nextDist.y;
        nextDist -= nextDist.y;
        nextDist.y += stepSizes.y;
        normal = vec2(0.0, -stepDir.y);
    }

    // Check for voxel intersection
    // normal is the intersection normal
}
What’s exactly happening here though? Let’s go through the code in chunks:
vec2 stepSizes = 1.0 / abs(direction);
vec2 stepDir;
vec2 nextDist;
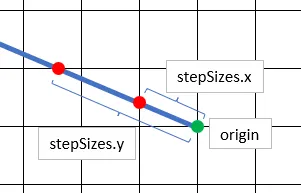
We first create our variables, but only initialize stepSizes. stepSizes stores
the distance we need to travel along the ray to reach the next voxel in every
direction from the edges. These are the distances between the red and blue dots
from the image above.
if (direction.x < 0.0) {
    stepDir.x = -1.0;
    nextDist.x = -fract(origin.x) / direction.x;
} else {
    stepDir.x = 1.0;
    nextDist.x = (1.0 - fract(origin.x)) / direction.x;
}
This and the copy of this I left out set the default values for our other
variables. stepDir just stores the direction we need to step if we move one
voxel along the ray. nextDist on the other hand is the main variable of the
algorithm. It stores the distance we need to travel along the ray to reach the
next voxel on each axis from our current position. This also depends on what
direction the ray is traveling, but if you just create a quick sketch of each
case on paper, you’ll find the correct values.
fractreturns the fractional part of the number, so from2.75it makes0.75and for-1.6it returns0.4
vec2 voxelPos = floor(origin);
vec2 currPos = origin;
voxelPos stores the current (integer) voxel position and currPos stores the
actual position so that we don’t mess with the ray origin in case we need it.
It’s important to have a separate voxelPos variable instead of just
floor-ing the current position, since this way we avoid potential floating
point errors.
if (nextDist.x < nextDist.y) {
    // Closest face is in the x direction
    voxelPos.x += stepDir.x;
    currPos += direction * nextDist.x;
    nextDist.x += stepSizes.x;
    normal = vec2(-stepDir.x, 0.0);
} else {
    // Closest face is in the y direction
    voxelPos.y += stepDir.y;
    currPos += direction * nextDist.y;
    nextDist.y += stepSizes.y;
    normal = vec2(0.0, -stepDir.y);
}
Multiple things happen here. Since nextDist stores the distance we need to
travel along the direction to reach the next voxel edge on each axis, it’s easy
to see that the distance to the closest voxel edge is just the smallest value in
the vector.
Once we know the closest voxel edge, we can update our variables. We first move
voxelPos 1 step along the current axis in the ray direction, then we move the
current position.
Next we update nextDist. We know how much we stepped along the ray so we can
subtract that from all axes, then since one of the axes became 0 (since we
should’ve arrived at a voxel boundary) we need to update that to reflect the
distance to the next voxel. Since stepSizes stores these values, we can just
use that.
Lastly we can create the normal vector in case we need it later.
Optimization
The main issue with the algorithm is the amount of branching it needs. Although it doesn’t look bad, but if we want to add a third axis, we will need to add a third branch as well. Since even rays starting from the same positions will take different paths based on their directions this quickly leads to thread divergence, which causes huge performance issues on GPUs.
So, optimally we’d like to do everything in a branchless way. First let’s look at the code outside of the loop. We can easily remove all of that with some GLSL magic:
vec2 stepSizes = 1.0 / abs(direction);
// In the rare case either axis becomes 0 we won't run into any issues
// since then we aren't moving along that axis anyways
vec2 stepDir = sign(direction);
// This is just a simplification of the ifs into one formula
vec2 nextDist = (stepDir * 0.5 + 0.5 - fract(origin)) / direction;
Then we can do the same for the code inside the loop:
float closestDist = min(nextDist.x, nextDist.y);
currPos += direction * closestDist;
vec2 stepAxis = vec2(equal(nextDist, vec2(closestDist)));
voxelPos += stepAxis * stepDir;
nextDist += stepSizes * stepAxis - closestDist;
normal = -stepAxis * stepDir;
The only thing that really changed here is replacing the two ifs with
stepAxis. For this we first calculated the smallest step we can take to reach
the next voxel (closestDist). We then want to find which axis it came from.
The fastest way to do this is to use the builting equal function of GLSL. This
function takes two vectors and returns a boolean vector with true where the
value of one axis from the first vector is equal to the value from the same axis
from the second vector, in other words:
equal(vec3(x1, y1, z1), vec3(x2, y2, z2))
==
bvec3(x1 == x2, y1 == y2, z1 == z2)
Since we know what the smallest value is from the vector, if we check which axis is equal to this value, we get which axis we need to step along.
Putting these together should yield a relatively simple and fast voxel tracing
algorithm. Extending it to a third axis is easily done by changing the vec2-s
to vec3-s and making sure closestDist is the minimum of the three axes.
Related articles: